In the last post we tested Elixir’s chops for finance and risk-management workloads using Nx, Pythonx, VegaLite, and Livebook. Today we’ll play to Elixir’s strengths by building a document factory, a service that turns user data into polished PDFs based on predefined templates.
This kind of application is quite common in finance, where regulation requires adequate communication and disclosures of product specifications as well as risk measures. Our goal is to automate the production of the documents containing these disclosures and fold it into a robust Elixir data pipeline.
If you're interested in seeing how to design templates for these documents, render them to PDFs, and orchestrate the whole production flow, read on. I hope you will find it informative.
Our objectives and high level technical considerations
Our objectives with this application are straightforward:
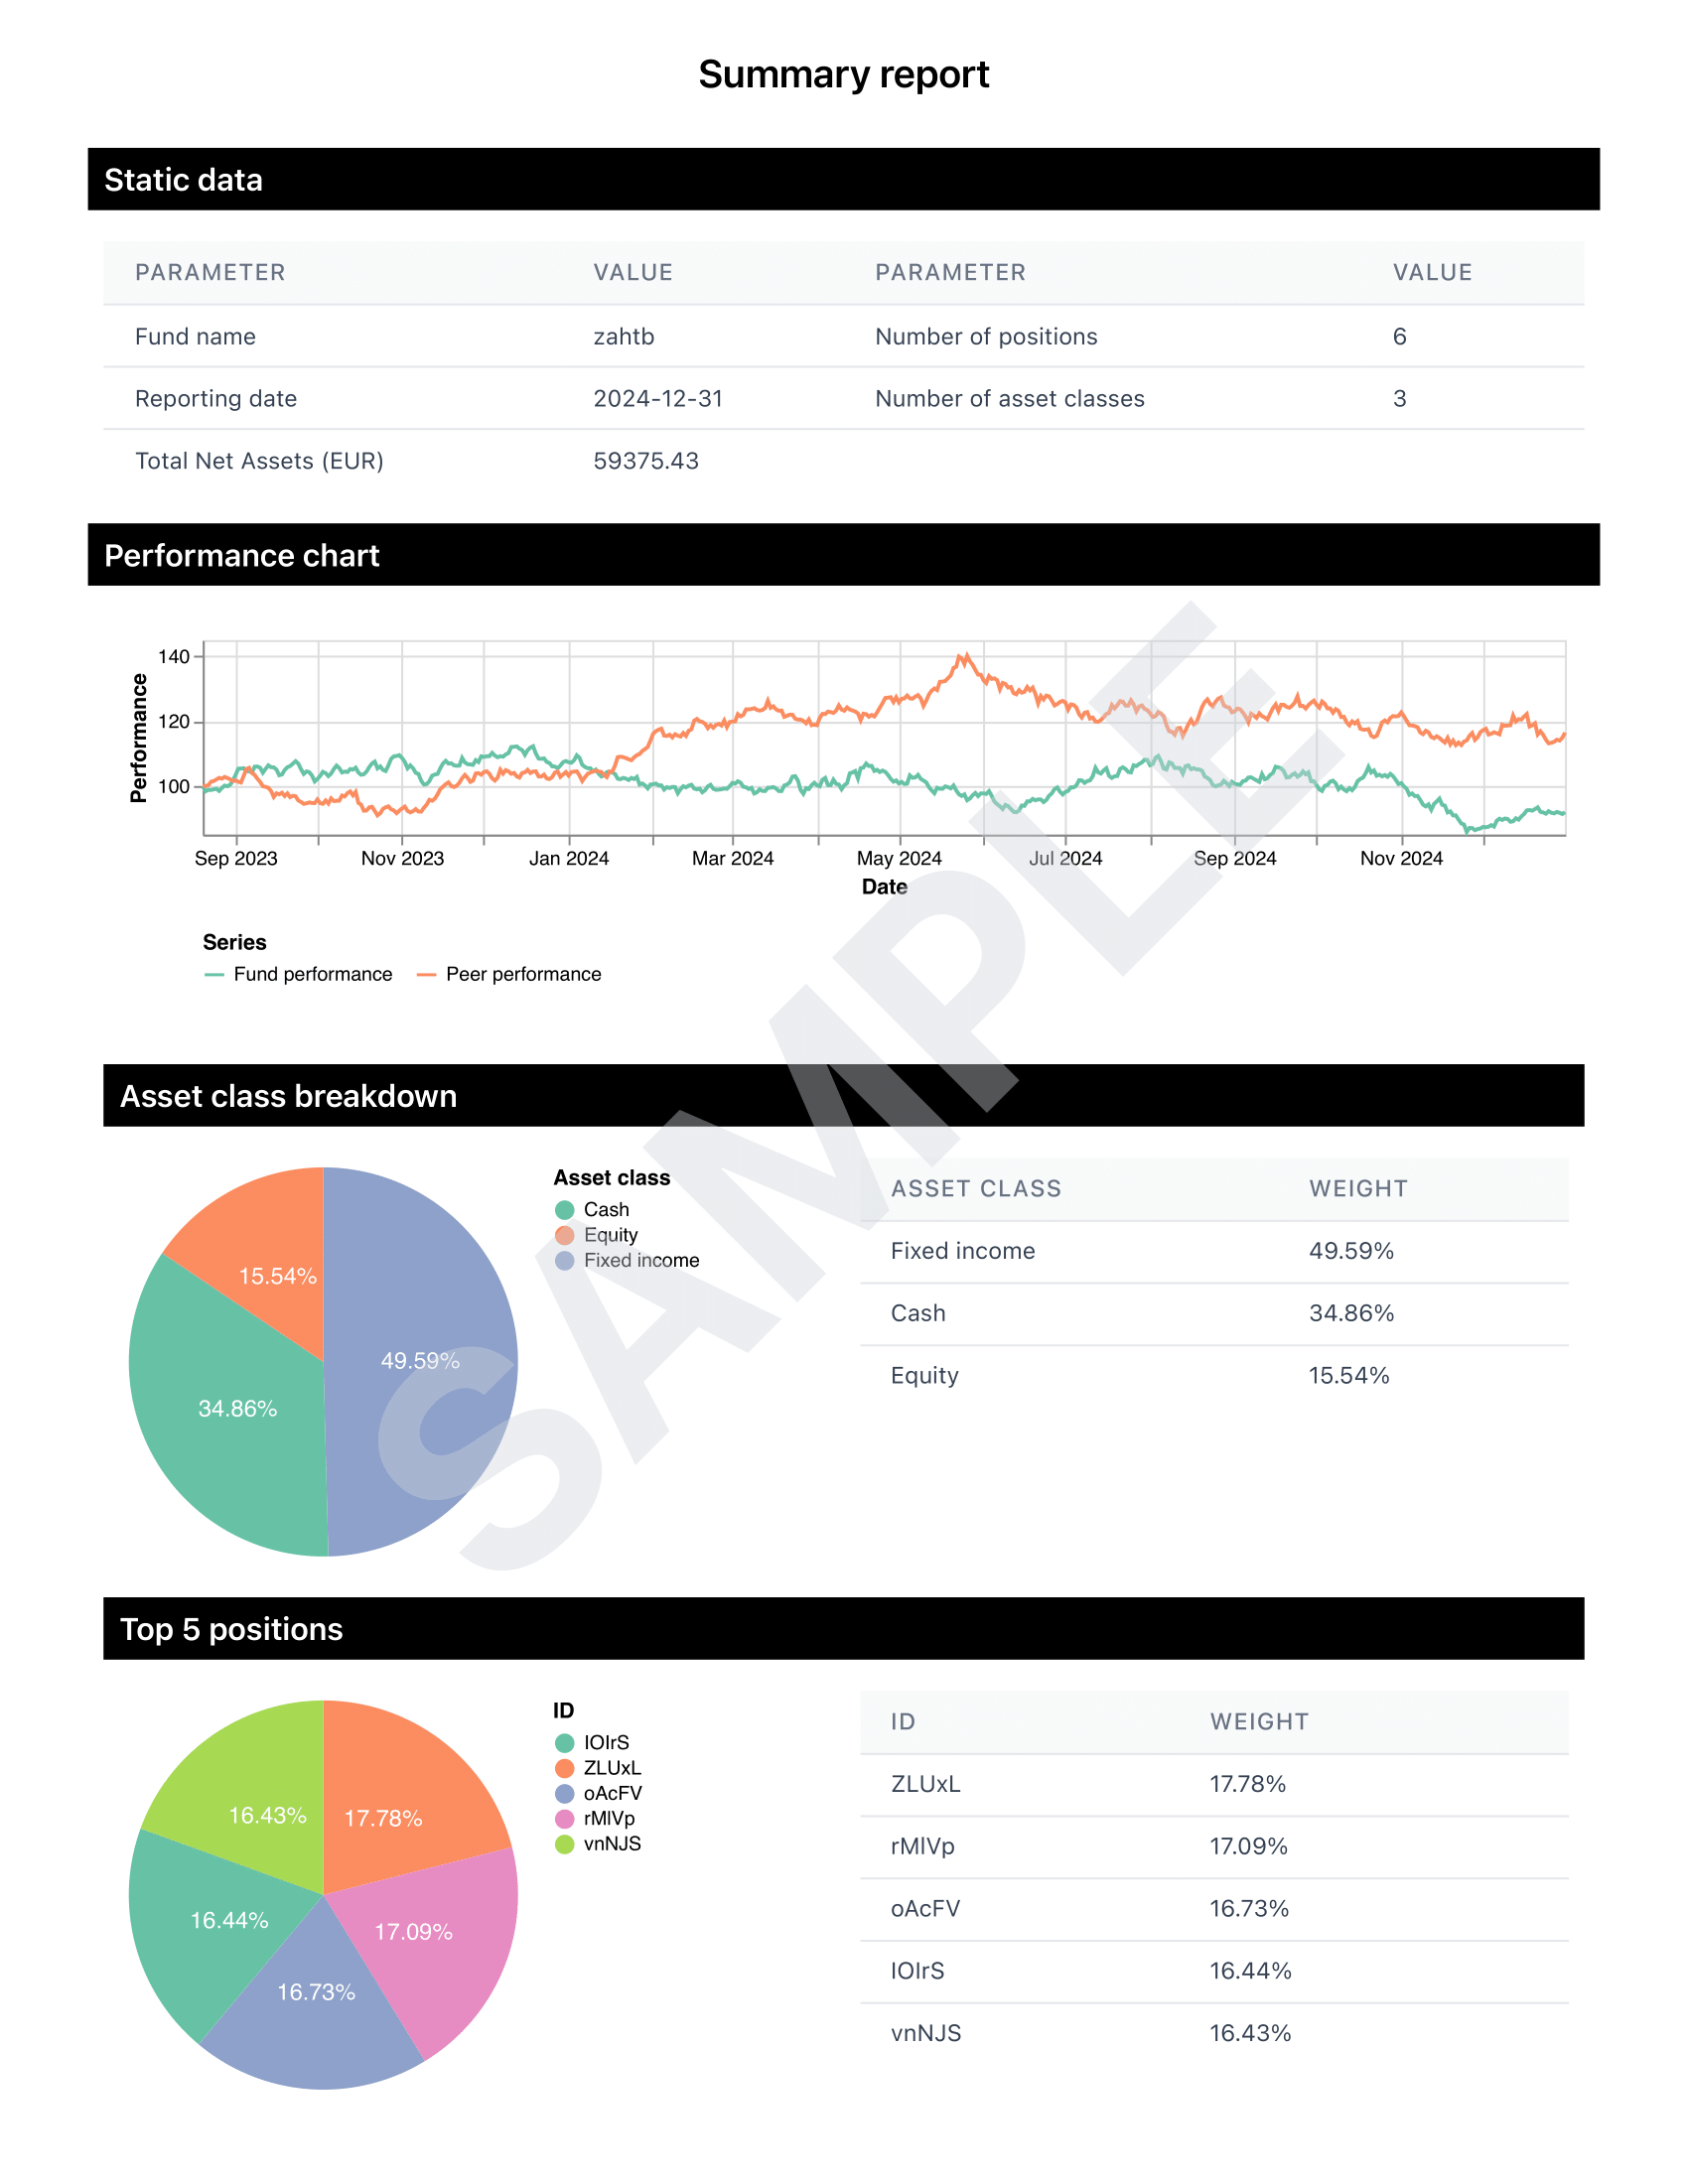
Our basic document template will be for a "factsheet" of sorts, as shown below:
How will our users request the building of documents? We will keep it simple and have our application watch a specific folder for files whose name matches a certain pattern. In production we'd swap that for, say, S3 event notifications, but the logic would stay the same.
To guarantee steady throughput, we'll implement the service as a data pipeline that assigns resources to each concurrent job according to workload.
In the next sections, we will first go over how we can go and build our documents in a programmatic way, to then focus on putting together the pipeline, and cap it all off with a few test runs with realistic loads.
Building documents
In this section, we provide one approach of automating document creation. This approach is quite commonplace and I'm sure anyone who has worked in that space will feel right at home!
How to build PDF documents in Elixir
Modern PDF generation usually piggybacks on a browser's built-in "Print to PDF" feature. We’ll do the same: render a print-friendly HTML page, let a headless Chrome instance "print" it, and grab the resulting file.
Conceptually the flow looks like this:
flowchart LR
    D[/Data/] e1@-->|Elixir| H[/HTML/] e2@-->|Headless browser| P[/PDF/]
    e1@{animate: true}
    e2@{animate: true}
To run a headless browser in Elixir for the specific purpose of building PDF documents, we use ChromicPDF, a library that has the advantage of not relying on Puppeteer, a very well-known open-source tool that requires NodeJS to run.
ChromicPDF works by launching a Chrome process as well as a pool of targets that will be running the PDF conversion jobs. This pool is then attached to our application, which supervises it, thus enabling concurrency and fault tolerance, as per the BEAM principles.
To attach ChromicPDF to our application, we need to add it to the processes supervised by our application's supervisor, which is located in the application.ex in our Mix project (after installing it as a dependency), as shown below.
defmodule Docmaker.Application do
  use Application

  @impl true
  def start(_type, _args) do
    children = [
      {ChromicPDF, chromic_pdf_opts()}
      # ...
    ]

    opts = [strategy: :one_for_one, name: Docmaker.Supervisor]

    # Our application is actually a supervisor process that is
    # supervising other child processes, including the one started
    # by ChromicPDF.
    Supervisor.start_link(children, opts)
  end

  # You don't have to worry about these options. These are there just to
  # make sure ChromicPDF runs smoothly. These should be tuned to the
  # machine the code is running on.
  defp chromic_pdf_opts do
    [
      session_pool: [
        size: 10,
        timeout: 10_000,
        checkout_timeout: 5_000,
        max_uses: 1000
      ]
    ]
  end
end
Once we have access to ChromicPDF in our application, using it to convert HTML documents is very simple, just call ChromicPDF.print_to_pdf/2, and pass it either an HTML string, or the path to an HTML file:
defmodule Examples.Conversion do
  @doc """
  Convert an HTML file to a PDF.
  """
  def convert_file(path_to_html, path_to_pdf) do
    ChromicPDF.print_to_pdf({:file, path_to_html}, output: path_to_pdf)
  end

  @doc """
  Convert an HTML string to a PDF.
  """
  def convert_string(html, path_to_pdf) do
    ChromicPDF.print_to_pdf({:html, html}, output: path_to_pdf)
  end
end
Because ChromicPDF uses NimblePool under the hood, we do not have to manage the Chrome session ourselves, ChromicPDF will take care of everything, with the settings we loaded in application.ex. For these conversions to be done concurrently however, we need to make sure that the calls to ChromicPDF.print_to_pdf/2 are performed by different BEAM processes.
We show a simple implementation for processing a list of HTML files below, using Task.async_stream to spawn new single-purpose processes, and then Enum.to_list to collect the outputs.
defmodule Examples.Conversion do
  # ...

  def convert_many_files(html_paths, pdf_paths) do
    Enum.zip(html_paths, pdf_paths)
    # Perform asynchronous PDF conversions
    |> Task.async_stream(fn {html_path, pdf_path} ->
      ChromicPDF.print_to_pdf({:file, html_path}, output: pdf_path)
    end)
    # Collect the results
    |> Enum.to_list()
  end
end
Building HTML documents
Depending on the complexity of HTML documents, one may start by considering interpolating Elixir variables directly into a string. For example, we could add a title and a body to an HTML document like this:
defmodule Examples.Html do
  def interpolation(doc_title, body, output) do
    html = """
    <!DOCTYPE html>
    <html lang="en">
      <head>
        <meta charset="UTF-8">
        <meta name="viewport" content="width=device-width, initial-scale=1.0">
        <title>#{doc_title}</title>
      </head>
      <body>
        <h1>#{doc_title}</h1>
        <p>#{body}</p>
      </body>
    </html>
    """

    File.write!(output, html)
  end
end
This approach works fine for very simple use cases, but it will very quickly become a nightmare to maintain, as we do not get to enjoy any kind of syntax highlighting. We'd also have to make sure every user input is escaped properly, as unescaped user input may lead to them injecting scripts in our documents, which will execute in Chrome during conversion, and potentially wreak havoc in our system.
Imagine someone supplying something like this for
doc_title:</title> <script>alert("some malicious script")</script> <title>This is a simple Javascript injection, made way too easy by interpolating unescaped Elixir strings into HTML.
The safer and more maintainable option is to use HTML templates. In Python, we have libraries like Jinja2 that allow us to do just that. In Elixir, we leverage on the amazing Phoenix framework, which ships with a component model that allows us to write Elixir in HTML templates, written using HEEx.
To build a Phoenix HTML component, we simply add use Phoenix.Component at the top of our module, and define a function that will return a HEEx template (defined using the ~H sigil). A HEEx template is HTML written in a string but that allows us to compose these components, evaluate loops, etc. In our editor, we also benefit from HTML syntax highlighting for those strings, even if they're written in a .ex file.
For example, the LinkList component below will render a title and a list of links based on arguments provided by the user (here title and links).
defmodule Examples.LinkList do
  use Phoenix.Component

  # Component attributes
  attr :title, :string, required: true
  attr :links, :list, default: []

  def render(assigns) do
    ~H"""
    <div>
      <h1>{@title}</h1>
      <ul>
        <li :for={link <- @links}>
          <a href={link.href}>{link.title}</a>
        </li>
      </ul>
    </div>
    """
  end
end
The special attr macro we use in our component will be used to raise compiler warnings when this component is used without these attributes supplied. This improves developer experience significantly, for example when building a higher order component, like the one below:
defmodule Examples.Multiplier do
  use Phoenix.Component

  attr :n, :integer, required: true
  attr :title, :string, required: true
  attr :links, :list, default: []

  def render(assigns) do
    ~H"""
    <div :for={_ <- 1..@n}>
      <!--
        Compiler warning in the line below if we forgot to
        supply `title` or `links`!
      -->
      <Examples.LinkList.render title={@title} links={@links} />
    </div>
    """
  end
end
Finally, to render a component, we start by calling the render function of the top-level component, e.g. Examples.Multiplier with an appropriate map of attributes, and turn it into a string by piping it to Phoenix.HTML.Safe.to_iodata/1.
html =
  %{
    n: 10,
    title: "Some title",
    links: [
      %{href: "/", title: "Home"},
      %{href: "/blog", title: "Blog"}
    ]
  }
  |> Examples.Multiplier.render()
  |> Phoenix.HTML.Safe.to_iodata()
Building our document layout
To build a layout for our documents, we use Tailwind, a great CSS framework that allows us to incorporate styles directly in our HTML, and therefore in our Phoenix components.
For that, we can use the tailwind tool in Elixir, which can help us manage the Tailwind version using a Mix configuration inside of our project, thus avoiding to bring in Javascript configuration into it.
We start by building our Main layout as a Phoenix component that will set some things for the whole sheet, including the title of the document and the path to the Tailwind-generated CSS file.
defmodule Layouts.Main do
  use Phoenix.Component

  attr :css, :string, required: true
  attr :watermark?, :boolean, default: false
  slot :inner_block

  def render(assigns) do
    ~H"""
    <!DOCTYPE html>
    <html lang="en">
      <head>
        <meta charset="UTF-8" />
        <meta name="viewport" content="width=device-width, initial-scale=1.0" />
        <style>
          @page {
            margin: 0;
            size: A4;
          }
        </style>
        <style>
          <!-- The CSS generated by Tailwind will go here -->
        </style>
        <title>Document</title>
      </head>
      <body class="bg-white max-h-[1122px] overflow-auto w-screen flex flex-col p-2">
        <!-- Content -->
        <div class="w-full h-full">
          {render_slot(@inner_block)}
        </div>
      </body>
    </html>
    """
  end
end
defmodule Layouts.Grid do
  use Phoenix.Component

  def render(assigns) do
    ~H"""
    <Layouts.Main.render css={@css} watermark?={@watermark?}>
      <div class="flex items-center justify-center w-full py-4">
        <h1 class="w-full text-xl font-semibold text-center">
          Summary report
        </h1>
      </div>
      <h2 class="w-full p-1 px-2 my-2 text-base font-semibold text-white bg-black">
        Static data
      </h2>
      <div class="flex items-center justify-center w-full p-2">
        <!-- Static data will go here -->
      </div>

      <h2 class="w-full p-1 px-2 my-2 text-base font-semibold text-white bg-black">
        Performance chart
      </h2>
      <div class="flex items-center justify-center h-[222px] w-full">
        <!-- Performance chart goes here -->
      </div>

      <div class="grid grid-cols-2 p-2">
        <h2 class="w-full col-span-2 p-1 px-2 my-2 text-base font-semibold text-white bg-black">
          Asset class breakdown
        </h2>
        <div class="flex flex-col items-center justify-start p-2">
          <!-- Pie chart for asset classes goes here -->
        </div>
        <div class="flex flex-col items-center justify-start p-2">
          <!-- Table for asset classes goes here -->
        </div>
        <h2 class="w-full col-span-2 p-1 px-2 my-2 text-base font-semibold text-white bg-black">
          Top 5 positions
        </h2>
        <div class="flex flex-col items-center justify-start p-2">
          <!-- Pie chart for top positions goes here -->
        </div>
        <div class="flex flex-col items-center justify-start p-2">
          <!-- Table for top positions goes here -->
        </div>
      </div>
    </Layouts.Main.render>
    """
  end
end
Simple right? Our Grid layout is nested inside our Main layout, thus benefitting from the styling defined therein. For now, our grid is left empty, but we will show examples on how to populate it next.
A quick illustration of our data transformation steps
The files our pipeline will be using to build the documents will be in JSON format and look like the sample below:
{
  "id": "mQsZU",
  "data": [
    { "id": "PLDai", "value": 6272.84, "category": "Fixed income" },
    { "id": "eqRwq", "value": 6557.23, "category": "Equity" }
  ],
  "perf": [
    { "value": 100.0, "date": "2023-08-20", "series": "Fund performance" },
    { "value": 100.0, "date": "2023-08-20", "series": "Peer performance" },
    { "value": 99.64, "date": "2023-08-21", "series": "Fund performance" },
    { "value": 100.18, "date": "2023-08-21", "series": "Peer performance" }
  ]
}
(Note: data in the data and perf lists has been heavily truncated for brevity.)
Our processing steps are much simpler than what we would have for a real document, but should be enough to illustrate what we are trying to do.
- We compute the total
valueof assets; - We isolate the top 5 positions in terms of
value; - We compute the aggregated value for each
category(i.e. asset class); - We build pie charts and tables from that processed data.
The code for these steps is provided below, with some comments:
defmodule Layouts.Grid do
  use Phoenix.Component

  # ...

  defp prepare_data(assigns) do
    # Grab "data" and keep adding the `value` field.
    # Our functions use the "capture" syntax provided by Elixir, which
    # helps writing anonymous functions faster.
    tna =
      assigns.ptf["data"]
      |> Enum.reduce(0, &(&2 + &1["value"]))

    top_5_positions =
      assigns.ptf["data"]
      # Sort by decreasing `value`
      |> Enum.sort_by(& &1["value"], &>=/2)
      # Only take the 5 largest positions
      |> Enum.take(5)
      # Compute weights for each position
      |> Enum.map(&Map.put(&1, :weight_raw, &1["value"] / tna))

    asset_class_breakdown =
      assigns.ptf["data"]
      # Aggregate over `category`, summing `value`
      |> Enum.reduce(%{}, fn %{"category" => c, "value" => v}, acc ->
        Map.update(acc, c, v, fn vv -> vv + v end)
      end)
      |> Enum.to_list()
      |> Enum.map(fn {cat, value} ->
        %{
          asset_class: cat,
          value: Float.round(value * 1.0, 2),
          weight_raw: value / tna,
        }
      end)
      |> Enum.sort_by(& &1[:value], &>=/2)

    # We update the data map and return it
    assigns
    |> Map.put(:tna, tna)
    |> Map.put(:top_5_data, top_5_positions)
    |> Map.put(:ac_breakdown, asset_class_breakdown)
  end
end
This prepare_data/1 function will be called to update the map that has been passed to Layouts.Grid so we can then use the prepared data in our HEEx template.
For building the tables and charts, we have built specific Phoenix components that expect to receive data via attributes, perform the necessary transformations, and, for charts, build the SVGs we need and insert them into the HTML. We provide the example of the performance chart component below.
defmodule Components.LineChart do
  use Phoenix.Component
  alias VegaLite, as: Vl

  # We need to be able to inject raw HTML for our SVG
  import Phoenix.HTML, only: [raw: 1]

  attr :data, :list, required: true
  attr :x_col, :string, required: true
  attr :value_col, :string, required: true
  attr :title, :string, required: true

  def render(assigns) do
    # Build the chart from the data
    svg =
      Vl.new(width: 700, height: 100)
      |> Vl.config(padding: 20)
      |> Vl.data(values: assigns[:data])
      |> Vl.mark(:line)
      |> Vl.encode_field(:x, "date",
        type: :temporal,
        title: "Date",
        axis: [format: "%b %Y"]
      )
      |> Vl.encode_field(:y, "value",
        type: :quantitative,
        scale: [zero: false],
        title: assigns[:title]
      )
      |> Vl.encode_field(:color, "series",
        type: :nominal,
        scale: [scheme: "set2"],
        legend: [title: "Series", orient: "bottom"]
      )
      |> VegaLite.Convert.to_svg()

    # Update the data map
    assigns = assigns
      |> Map.put(:graph, svg)

    ~H"""
    <div class="w-full h-full">
      {raw(@graph)}
    </div>
    """
  end
end
That's all there is to it! Call Layouts.Grid.render/1 and Phoenix.HTML.Safe.to_iodata/1 with the right data map, and you will obtain an HTML string with the relevant data, tables and charts inserted!
But how can we handle requests efficiently for a large number of documents? Because ChromicPDF depends on the availability of Chrome resources for converting these documents, we will need to be quite careful to make sure our system doesn't get overloaded. This is why we are going to structure our application as a data pipeline!
Building our data pipeline
User inputs
As previously mentioned our application's entry point will be a file watcher. Whenever a file that matches a certain format is created or moved into a specific folder of our choosing, it will be picked up and processed. We can imagine that this folder will either be populated by users directly (in the case of a local application), or by automated scripts (which may themselves be data pipelines!).
The overall process can be illustrated as such, with our watcher sitting in front of the rest of our pipeline.
flowchart LR
  U((User))
  S((Script))
  F[[Folder]]

  subgraph Pipeline
  W[Watcher]
  P["..."]
  end

  U e1@-->|Deposit files| F
  S e2@-->|Deposit files| F
  W -->|Watches| F
  F ~~~ W
  W e3@-->|File contents| P

  e1@{animate: true}
  e2@{animate: true}
  e3@{animate: true}
In Elixir, we work with processes, lightweight threads of execution that can communicate with each other via message passing. That is how we can build highly concurrent and fault-tolerant programs. Working with the file system fits into that mold!
The file_system library provides a FileSystem GenServer (i.e. a process with state that can deal with messages using callback functions), to which other processes will be able to subscribe. To set our folder watcher, we will therefore have our own GenServer that will start the file watcher, subscribe to it, and then have a callback to handle messages from the watcher.
Here is the process:
- First, our GenServer will start the
FileSystemGenServer, and get its PID (process identifier). - Using that PID, our GenServer will subscribe to the
FileSystemGenServer. Doing so means that any file event received by the latter will be sent to the former in the following form:{:file_event, watcher_pid, {path, events}}. - Upon receiving that message, the
handle_infocallback of our GenServer will be called, and that is where the processing of events is taking place.
Below is the whole code needed to orchestrate this process:
defmodule FileWatcher do
  use GenServer

  def start_link(args) do
    GenServer.start_link(__MODULE__, args)
  end

  @impl true
  def init(args) do
    # Upon initialization of the GenServer, we start the file watcher
    # process and have the current process subscribe to it. This means
    # the current process will receive messages whenever events are
    # observed on the folder

    {:ok, watcher_pid} = FileSystem.start_link(args)
    FileSystem.subscribe(watcher_pid)
    {:ok, %{watcher_pid: watcher_pid}}
  end

  @impl true
  def handle_info({:file_event, _watcher_pid, {path, events}}, state) do
    # When a file event is received, we print it out.

    IO.puts("📂 Events detected!")

    event_str =
      events
      |> Enum.map(&Atom.to_string/1)
      |> Enum.join(", ")

    IO.puts("Path: #{path} - Events: #{event_str}")

    {:noreply, state}
  end

  # Case of other messages that are not tied to file events
  def handle_info(_msg, state), do: {:noreply, state}
end
Our data pipeline
As previously mentioned, we will build our application as a data pipeline, i.e. a step of computation steps linked to each other, each responsible for a specific processing step.
Because we want to keep it very simple for now, the pipeline will only be made up of two steps:
flowchart LR;
  FileWatcher e1@--> DocumentBuilder
  e1@{animate: true}
- The
FileWatcherwill watch a folder for incoming files; and - The
DocumentBuilderwill take the content of files, and transform them to PDF documents.
A simple addition to be considered is to add a Notifier that will batch events and notify the requestor at the end of our pipeline, but this minimal example will get the job done for now.
The main advantage of a data pipeline is that we can tune it to avoid bottlenecks. For example, imagine that DocumentBuilder can only realistically handle the production of 5 documents at any given time. In that situation, we need to make sure that the FileWatcher does not send it too many files to process. For that, the pipeline will be based on a pull model, where consumers request work from producers, based on their available capacity. This type of pipeline is said to provide back-pressure.
We have already seen how to build a file watcher in Elixir, but we now have to make a couple of modifications to make it work as a GenStage producer:
- The file watcher will need to hold some state, as it won't be able to pass along all of the files it sees being created. For that, its state will be a simple FIFO queue.
- Upon request, it will dispatch events to its consumers for processing. Here, the sole consumer is the
DocumentBuilder. To implement this, we only need to define thehandle_demandcallback, and the rest will be handled by GenStage!
The code for this pipeline step is provided below:
defmodule Docmaker.FileWatcher do
  use GenStage

  def start_link(opts) do
    # Get the folder to watch from the provided options
    folder = Keyword.fetch!(opts, :folder)
    GenStage.start_link(__MODULE__, folder, opts)
  end

  @impl true
  def init(folder) do
    # Set up of file watcher
    {:ok, watcher_pid} = FileSystem.start_link(dirs: [folder])
    FileSystem.subscribe(watcher_pid)

    # State for our pipeline step
    state = %{
      folder: folder,
      queue: :queue.new(),
      demand: 0
    }

    # We tell GenStage this is a producer step
    {:producer, state}
  end

  @impl true
  def handle_demand(incoming_demand, state) do
    # Upon demand, dispatch available events (i.e. file paths)
    new_state = %{state | demand: state.demand + incoming_demand}
    dispatch_events(new_state)
  end

  @impl true
  def handle_info({:file_event, _watcher_pid, {path, events}}, state) do
    # This is called upon receiving a file event. We queue the file
    # and immediately dispatch. If there is no demand, nothing will happen.
    # If there is demand, the file will be sent on its own.
    filename = Path.basename(path)
    pattern = ~r/^docreq_[\w-]+\.json$/

    if :created in events and :removed not in events and filename =~ pattern do
      {:ok, content} =
        File.read!(path)
        |> JSON.decode()

      queue = :queue.in({path, content}, state.queue)
      new_state = %{state | queue: queue}

      # We dispatch the contents of the processed files
      dispatch_events(new_state)
    else
      {:noreply, [], state}
    end
  end

  def handle_info(_msg, state), do: {:noreply, [], state}

  defp dispatch_events(%{demand: demand, queue: queue} = state) when demand > 0 do
    # Only dispatch events based on passed demand
    {events, new_queue} = dequeue(queue, demand, [])
    sent = length(events)
    new_state = %{state | queue: new_queue, demand: demand - sent}
    {:noreply, events, new_state}
  end

  defp dispatch_events(state) do
    # No demand or no files
    {:noreply, [], state}
  end

  defp dequeue(queue, 0, acc), do: {Enum.reverse(acc), queue}

  defp dequeue(queue, count, acc) do
    case :queue.out(queue) do
      {{:value, item}, rest} ->
        dequeue(rest, count - 1, [item | acc])

      {:empty, _} ->
        {Enum.reverse(acc), queue}
    end
  end
end
Our DocumentBuilder will be a consumer in our pipeline. It will "consume" events dispatched by the FileWatcher (i.e. file contents), and process them by converting that data to PDF documents according to our defined templates. The initialization code for this consumer will differ from that of the producer, as it will set how much demand can be handled, based on ChromicPDF's own limitations, and it will immediately subscribe to the FileWatcher, thus wiring up our pipeline.
The initialization code is written below
defmodule Docmaker.DocumentBuilder do
  use GenStage

  # ...

  @impl true
  def init({current_date, css_path}) do
    pool_size =
      Application.fetch_env!(:docmaker, ChromicPDF)
      |> Keyword.get(:session_pool, [])
      |> Keyword.get(:size, System.schedulers_online())

    {:consumer, {current_date, css_path, pool_size},
     subscribe_to: [
       {:file_watcher, [max_demand: pool_size, min_demand: 1]}
     ]}
  end

  # ...
end
As a consumer, our DocumentBuilder will be handling events it receives from upstream producers. Because we're using GenStage, we only have to define the handle_events/3 function, which will take the list of events, the PID of the producer, and the current state of our consumer as arguments.
As previously explained, we have to make sure that each of our conversion job is run into a separate process so we can do that work concurrently. This is as simple as calling Task.async_stream on all of our events, with the appropriate max_concurrency parameter, although it doesn't matter here since the list of events will never be larger than our pool_size, as defined above.
defmodule Docmaker.DocumentBuilder do
  use GenStage

  # ...

  def handle_events(events, _from, {current_date, css_path, pool_size} = state) do
    events
    |> Task.async_stream(
      fn {path, ptf} ->
        # Build the HTML document
        html =
          %{
            ptf: ptf,
            current_date: current_date,
            css_path: css_path,
            watermark?: true
          }
          |> Layouts.Grid.render()
          |> Docmaker.render()

        # Convert the file and store it to disk
        ChromicPDF.print_to_pdf({:html, html}, output: "output/output_#{ptf["id"]}.pdf")

        # Delete the original JSON file
        File.rm(path)
      end,
      max_concurrency: pool_size,
      timeout: :infinity
    )
    |> Enum.to_list()

    {:noreply, [], state}
  end

end
Running our pipeline
To put this application in production, we will most likely start by setting up a Mix release inside a docker container, and mount a volume for our watched folder. For now however, we are only concerned about being to run this pipeline on our machine, so we will be testing it using a script we will run mix run.
When calling mix run <path to script>, the script will run in our application, which means that the supervision tree will be started. For now, we have only added ChromicPDF to that supervision tree. Let's modify the code in application.ex to add our pipeline components.
defmodule Docmaker.Application do
  use Application

  @chromic_pdf_opts Application.compile_env!(:docmaker, ChromicPDF)

  @impl true
  def start(_type, _args) do
    # We fetch the settings from our configuration
    app_conf = Application.fetch_env!(:docmaker, Docmaker.Application)
    doc_conf = app_conf[:document_builder]
    watcher_conf = app_conf[:file_watcher]

    children = [
      {ChromicPDF, @chromic_pdf_opts},

      # Now, our whole pipeline will be live as soon as our application
      # starts!
      {Docmaker.FileWatcher, watcher_conf},
      {Docmaker.DocumentBuilder, doc_conf}
    ]

    opts = [strategy: :one_for_one, name: Docmaker.Supervisor]
    Supervisor.start_link(children, opts)
  end
end
Now, let's set up a script that will simulate data and write a number of files to the watched folder! Because our application will be running, these will be immediately
# scripts/stage.exs

dir_path = "/path/to/data"

# Allow for passing the number of portfolios as an argument
# to the script
n = System.argv() |> Enum.at(0) |> String.to_integer()

# This function simulates `n` portfolio at the date provided
Simulator.portfolios(n, ~D"2024-12-31")
# Write all of these portfolios to disk, concurrently of course
|> Task.async_stream(
  fn ptf ->
    path = Path.join(dir_path, "docreq_#{ptf.id}.json")
    File.write!(path, JSON.encode!(ptf))
  end,
  max_concurrency: System.schedulers_online(),
  timeout: :infinity
)
|> Stream.run()

# We set up a poller to watch the watched folder.
# The code below will keep looping until the watched folder
# is empty, which means we're done processing files!
{time, result} =
  :timer.tc(fn ->
    Utils.Poller.watch(dir_path)
  end)

case result do
  :ok ->
    IO.puts("Ran in #{time / 1_000_000} seconds")

  {:error, reason} ->
    IO.puts("Error: #{reason}")
end
To run this script, we can just run the following command in our shell, which will generate 1000 PDFs based on simulated data.
mix run ./scripts/stage.exs 1000
Ran in 89.738613 seconds
Conclusion
Generating 1,000 PDFs in about 1 and a half minute is not too shabby, although I am sure we could do better! Possible avenues to explore are of course:
- Running on a beefier machine, since the BEAM can vertically scale quite well;
- Distributing the workload on multiple machines, which can be done natively in Elixir;
- Fine-tuning our concurrency settings.
On top of that, I'd like to explore the possibility of having the payload (i.e. our JSON files) provide the template to be used for rendering each document. This is not too complicated, as Elixir allows us to execute functions by programmatically providing the module and functions names like such:
map = %{} # Our data map

"Grid"
|> String.to_atom()
# Build up the module
|> Kernel.then(&Module.concat(Layouts, &1))
# Call the render function
|> apply(:render, [map])
Hope this showed you something else that is possible with Elixir, and hopefully give you one more reason to give it a try!